A youth worker toolkit for inclusive practice with AI
This toolkit was built by and for youth workers. It came out of a real week of learning, experimenting, and building together in Riga. Everything in it has been tested in practice, by people who do the same kind of work you do.
This toolkit is free, open, and yours to use. You can read it from start to finish, or jump straight to the section that is most useful right now.
If you are new to AI, we recommend starting from Section 2 and working forward.
If you already have some experience, feel free to skip ahead to the workflows in Section 5.
InFormal Intelligence was a one-week professional development training for youth workers, funded through the Erasmus+ programme (KA153-YOU, Mobility of Youth Workers). It took place in Riga, Latvia in May 2026, bringing together 38 youth workers and facilitators from six countries: Latvia, Malta, Spain, Türkiye, Romania, and Portugal.
The starting point was pretty straightforward: youth workers across Europe want to make their work more inclusive, but doing it well takes time, effort, and skills that most people have not had the chance to build yet. And AI tools are becoming genuinely useful for exactly this, not as some futuristic thing, but as practical ways to reduce workload while making the materials you produce actually better and more accessible.
InFormal Intelligence was designed to connect those two things.
Over seven working days, participants explored what inclusion really means in youth work, starting with empathy and lived experience, before getting into practical digital skills. The whole week was built on non-formal education methods: simulations, storytelling, group challenges, peer learning, and lots of hands-on tool exploration. By the end of the week, every participant had:
Worked through real accessibility barriers from the perspective of young people who experience them.
Learned how to use AI tools to simplify text, create audio content, design accessible visuals, and build multi-format learning materials.
Practised prompting frameworks and applied them to real youth work tasks.
Produced their own set of inclusive materials, uploaded to a shared toolkit.
This toolkit was produced by the project team and participants of InFormal Intelligence. It is coordinated by Peace of Mind (Latvia), with partner organisations from Malta, Spain, Türkiye, Romania, and Portugal.
It is published as an open resource under the Erasmus+ dissemination commitment, so anyone can use it, share it, or build on it.
This toolkit is for youth workers. Specifically the ones who:
You do not need to have attended the training. You do not need technical skills. You just need to want to do better work.
Before we get into any tools or workflows, we need to talk about who we are actually designing for. Because if you don't have that clear, using AI for inclusion is just guesswork with extra steps.
This section is not about theory. It is about developing a practical sense of who gets left out in youth work, why it happens, and what it actually looks like when you design with those people in mind from the start.
Most exclusion in youth work is not intentional. Nobody sits down and decides to create a session that leaves certain young people behind. It happens because we design for the person we imagine in our head, and that imaginary person tends to look a lot like us: comfortable with written text, fluent in the language being used, able to sit still and focus for extended periods, with no significant sensory or processing differences.
The moment you start designing for a wider range of people from the beginning, rather than patching accessibility on at the end, the quality of your work goes up for everyone. Simpler language helps non-native speakers, yes, but it also helps people who are tired, stressed, or reading quickly on a phone. Audio versions of materials help people with visual impairments, but they also help people who learn better by listening. Clearer visual structure helps people with dyslexia, and it helps absolutely everyone who has ever had to read a cluttered, overstuffed activity sheet.
This is what inclusive design actually means. Not a special version for a minority of people. A better version for everyone.
The profiles below represent real groups of young people and youth workers who encounter barriers in typical programme settings. They are not rigid boxes, and real people rarely fit neatly into one category. But having a concrete sense of who might be in the room, and what their experience looks like, is the foundation of designing anything more inclusive.
Each card shows what this person experiences on one side, and what actually helps on the other. Tap any card to flip it.
Young people with ADHD often struggle less with understanding content and more with the conditions it is delivered in. Sitting still for long stretches, filtering out background noise and visual clutter, staying on track when a task has many steps, and holding focus when the pace of a session drops, these are the real challenges. It is not about effort or motivation. The brain is simply wired to need more stimulation, clearer structure, and more frequent points of re-engagement to stay connected to what is happening.
In a typical youth work session, someone with ADHD might lose the thread during a long verbal explanation, feel overwhelmed by a complex instruction sheet, or struggle to finish a task that requires sustained quiet focus. They might also be one of the most energetic and creative contributors in the room, given the right conditions.
What helpsWhat helps
Dyslexia affects the way the brain processes written language. For someone with dyslexia, reading is not just slower, it can be genuinely exhausting. Letters may appear to move or blur, words get jumbled, and the effort of decoding text takes so much cognitive energy that understanding the actual content becomes harder. This is especially true under time pressure, in noisy environments, or when the text is long and dense.
In a youth work setting, this might look like someone who takes much longer to read a handout, avoids activities that involve writing, seems disengaged during text-heavy sessions, or consistently produces work that does not reflect what they actually understand. Dyslexia has nothing to do with intelligence, but poorly designed materials can make a person feel like they are the problem.
What helpsWhat helps
Being deaf or hard of hearing in a group setting means navigating a world that is largely designed around the assumption that everyone can hear clearly. In a typical workshop, a huge proportion of the key information is delivered verbally: instructions, explanations, group discussions, facilitator comments, spontaneous exchanges. For someone who is deaf or has significant hearing loss, this content is simply not accessible unless something is actively done to make it so.
Background noise, poor room acoustics, fast speech, faces turned away from the person speaking, and no captions or visual support can make a group session exhausting or effectively useless. People in this situation often spend more energy trying to follow what is happening than engaging with the actual content.
What helpsWhat helps
For someone who is blind or has low vision, the barrier is not usually the content itself but the format it comes in. An activity sheet full of images with no descriptions, a presentation where the facilitator says “as you can see here” while pointing at a slide, a task that requires participants to look at something and respond visually, these are all formats that exclude someone who cannot see them clearly or at all.
Low vision is more common than full blindness, and it covers a wide range. Someone might be able to read large print but not standard text. Someone else might navigate well with screen reader software on a device but struggle entirely with printed materials. The key point is that visual-only delivery is never a safe assumption.
What helpsWhat helps
This profile covers a wide range of people: someone who arrived in the country recently and is still building language skills, a young person who grew up in an under-resourced education system, someone who reads slowly or with difficulty due to limited formal schooling, or a youth worker facilitating activities for a linguistically diverse group. What they share is that standard written and spoken language in programme materials is often more complex than it needs to be, and that complexity is a real barrier to participation.
It is easy to assume that if someone does not respond to a text or instruction, they are disengaged or not trying. In many cases, they simply cannot access the content in the format it has been delivered. This is invisible by design, because nobody wants to say in a group setting that they did not understand.
What helpsWhat helps
The fastest way to understand an access need is to feel it for a few minutes. These short online simulations let you step into someone else's experience. Try a couple before your next session, then notice what you would change about your own materials.
None of this requires a big budget or a specialist degree. Most of what helps, simpler language, better visual structure, audio alternatives, written versions of spoken content, is achievable with the tools in this toolkit and about ten minutes of extra thought when you are preparing a session.
The profiles above are not exhaustive, and the young people you work with will not fit neatly into one box. But having a real sense of who might be in the room, and what their experience looks like, changes the decisions you make. That is what this section is for.
One honest note before we get into tools: AI will not solve all of this. It will not replace thoughtful facilitation, genuine relationships, or the kind of awareness that only comes from listening to the people in your group. But it can meaningfully lower the barrier. An audio version of your handout, a plain language rewrite of a complex brief, a translated version of your activity sheet, these are real steps that make a real difference to real people. They are not perfect solutions, they are better options than doing nothing.
Everything in the next sections has been chosen with one constraint in mind: it should be free or available on a basic subscription, so the economic barrier to using it is as low as possible. There are more specialised, more powerful tools out there for each of these accessibility needs. But we deliberately focused on what any youth worker can pick up and use today, without a budget, without a procurement process, and without technical training. Simple, practical, and ready to go.
You have probably heard a lot about AI in the last couple of years. Some of it exciting, some of it alarming, most of it vague. Before we get into any tools, it is worth spending a few minutes building a realistic picture of what AI actually is, what it can do, and where it falls short. Not to make you an expert, just to make you a confident user.
At its core, AI is pattern recognition at scale. Your phone keyboard predicts the next word you are about to type based on patterns in how you write. A language model does the same thing, but at a completely different level of complexity. It has processed so much text that it can predict not just the next word but the next paragraph, the next argument, the next rewrite of your activity sheet in plain language.
It is not thinking. It is not understanding in the way a person understands. But because it has learned from an enormous amount of human writing, the outputs it produces can be remarkably useful.
AI is a very fast, very well-read collaborator that needs clear instructions and human judgment to be genuinely useful.
A lot of people feel like AI is something new and unfamiliar. It is not. If you have done any of the following, you have already been using AI for years:
These are all AI systems. They learn from data, recognise patterns, and make predictions. Language models like ChatGPT or Gemini work on the same basic principle, just applied to text, conversation, and content creation.
The category of AI we are focused on in this toolkit is called a Large Language Model, or LLM. Here is what it is genuinely good at:
Write, summarise, simplify, translate, reformat. This is where LLMs are most powerful and most directly useful for youth workers.
Break down a complex topic, compare options, pull together ideas from different sources into a coherent summary.
Session plans, social media posts, emails, reports, activity descriptions, welcome messages.
Answer questions, help you think through a problem, act as a sounding board for ideas.
Depending on the tool, process images, generate visuals, analyse audio or video.
Being reliably factually accurate on specific details, knowing your local context, understanding your participants, or replacing the judgment that comes from being in the room.
You do not need a technical vocabulary to use AI, but these eight terms come up constantly and are worth having a handle on.
The smallest unit of text the AI processes. Roughly one word, or part of a word. This is how AI measures length and cost.
The text the AI learned from. Books, websites, articles, code, and much more. This shapes what it knows and what biases it carries.
How much the AI can "see" at once in a single conversation. Think of it as short-term memory. Longer conversations or documents may eventually fall outside this window.
The instruction or message you give the AI. The quality of your prompt directly shapes the quality of what you get back. This is what Section 4 is entirely about.
The AI's generated response. Always worth reviewing critically rather than accepting as final.
A setting that controls how creative versus predictable the AI's responses are. High temperature means more varied and surprising outputs. Low temperature means more consistent and cautious ones.
When an AI confidently states something that is false. This happens because the model is generating plausible-sounding text, not retrieving verified facts. Always check specific claims, names, dates, and statistics.
Skewed outputs that come from imbalanced or unrepresentative training data. AI can reflect and amplify the biases present in the text it learned from, which is worth staying aware of, especially when creating materials for diverse groups.
If you have used different AI products and noticed they behave very differently, this is why.
The core AI. Trained on data, does the actual processing. The model is the brain.
Examples: GPT-4o, Claude, Gemini, Llama.
A specific capability the model can use to interact with the world. Not all models have access to the same tools.
Examples: web search, image generation, voice mode, code execution.
A set of instructions that loads automatically for a specific task, shaping how the model behaves.
Examples: Custom GPTs in ChatGPT, Gems in Gemini, Skills in Claude.
This is why two AI products built on similar technology can feel completely different to use, and why the same model with different tools enabled can do very different things.
Most of the workflows in this toolkit use one of three platforms. Here is a quick orientation.
| Feature | ChatGPT | Claude | Gemini |
|---|---|---|---|
| Image Generation | |||
| Video Generation | |||
| Advanced Voice Mode | |||
| Canvas / Artifacts | |||
| Deep Research | |||
| Projects / Memory | |||
| Web Browsing | |||
| Build Apps | |||
| Google Workspace | |||
| Video and Audio Input |
Honestly, it is hard to give a definitive answer here because all three are genuinely good, just at different things. The landscape changes fast, and what is true today may shift in six months. What we can say is this:
For most youth workers and NGOs, ChatGPT or Gemini will give you the most capabilities for your money. ChatGPT is the most versatile all-rounder, and Gemini is the better choice if your organisation runs on Google Workspace. If your work involves a lot of technical tasks, coding, or working with long complex documents, Claude is ahead of the others in those areas.
All three have free tiers, and everything in this toolkit can technically be done without paying. That said, to get the most out of any of these tools, a paid plan makes a real difference. The free versions have limits on usage, access to newer models, and some features. A subscription runs around 20 to 25 euros per month, and for most people who start using these tools regularly, that cost comes back quickly in time saved and the quality of what they produce. Our recommendation: pick one tool, try the free tier first, and if you find yourself using it consistently, the subscription is worth it.
Andrej Karpathy, one of the founders of OpenAI, said it well: "The hottest new programming language is English." That is not just a clever line. It reflects something genuinely new about where we are. For the first time, you do not need to learn a technical language to give instructions to a powerful computer system. You just need to write clearly.
That is what prompting is. It is the instruction you give the AI. And the quality of what you get back is directly shaped by how well you write it. The same tool, given two different prompts for the same task, can produce results that are worlds apart.
The good news is that prompting is not a technical skill. It is a communication skill. And most of the principles are ones you already know, you just need to apply them deliberately.
These apply regardless of which framework you use or how simple or complex your task is.
AI has no idea who you are, what organisation you work for, who your participants are, or what you are trying to achieve. The more relevant background you give, the more relevant the output. "Write me a workshop plan" will get you something generic. "I work for a youth NGO in Romania, I am running a 2-hour session on media literacy for 16-18 year olds with mixed digital literacy levels" will get you something usable.
If you want bullet points, say so. If you want a table, say so. If you want it in plain language at a reading age of 12, say so. If you do not specify, the AI will guess, and it often guesses wrong.
Vague descriptors like "nice", "beautiful", "stunning", or "engaging" mean almost nothing to an AI. They are not instructions. If you want something that feels warm and approachable, say that. If you want something visually clear and easy to scan, describe that specifically. The more concrete your language, the better the result.
Before you send a prompt, read it back and ask yourself: if a competent person completely unrelated to this task read these instructions, would they know exactly what to do? Would they have a lot of questions? If the answer is yes, they would be confused, the AI will almost certainly struggle too. LLMs are good at following clear instructions and bad at filling large gaps with the right assumptions. If your prompt is vague, the output will reflect that.
If the first result is not quite right, do not scrap everything and start again. Tell the AI what to change. "Make it shorter", "use simpler language", "rewrite the second paragraph to focus more on practical examples" all work well. Think of it as a back and forth, not a single shot.
You do not need to memorise all of these. The point is to have a structure that stops you from writing vague prompts. Start with one of the simpler ones, get comfortable, and try others when you are ready.
These two are the best starting point if you are new to prompting. Three to four elements, fast to write, good for everyday tasks.
Act as an Erasmus+ youth trainer. Create a 60-minute workshop plan on prompt writing for beginners. Present it as a simple session outline with timings, one icebreaker, one practical activity, and a short reflection.
Act as an Erasmus+ youth trainer. Create a 60-minute workshop on prompt writing. The learners are beginners in AI and come from different European countries. Present a simple workshop plan with an icebreaker, one practical activity, and a reflection.
These frameworks give you more control over tone, audience, and output structure. Good for when you need something more tailored.
Context: I am preparing an Erasmus+ session for beginners in AI. Action: Create a 60-minute workshop plan on prompt writing. Result: Make it practical, friendly, and easy to use. Example: Include an icebreaker, one hands-on activity, and a short reflection.
Role: Act as an Erasmus+ youth trainer. Input: The audience is new to AI and comes from different countries. Steps: First create a session outline, then add one practical activity, then include a reflection. Expectation: Present it as a simple 60-minute plan in clear language.
Context: I am planning an Erasmus+ training session for participants who are new to AI. Objective: Design a 60-minute workshop on prompt writing. Style: Use a clear and practical workshop-planning structure. Tone: Keep the language friendly and beginner-friendly. Audience: International participants with no technical background. Response: Present the answer as a timetable with activities and short facilitator notes.
Use these when you want precise control over style, structure, and variations. More elements to fill in, but the output will be much closer to what you need.
Act as an Erasmus+ youth trainer. The participants are beginners in AI and come from different European backgrounds. I am preparing a 60-minute session on prompt writing. Create a simple workshop plan with an icebreaker, one practical activity, and a short reflection. Use clear, friendly language for non-technical learners. Give me 2 versions: one for teenagers and one for adults.
Character: Act as an Erasmus+ youth trainer. Request: Create a 60-minute session plan on prompt writing. Examples: Include an icebreaker, one practical exercise, and a short reflection. Adjustments: Keep it simple, practical, and beginner-friendly. Type of output: Present it as a bullet-point workshop outline. Extras: The participants come from different European countries and are new to AI.
I need a 60-minute AI workshop plan for beginners. Think step by step: first identify the learning goal, then divide the session into time blocks, then suggest one interactive activity, and finally present the complete plan in a clear table.
You do not need to use a framework every time. For short simple tasks, a clear sentence or two is often enough. Frameworks are most useful when you are attempting something longer, more specific, or when your first attempt came back with something that missed the mark.
The underlying principle is always the same: the more clearly and completely you communicate what you need, the better the result. Think of the AI as a capable colleague who has just joined your team. Smart, fast, and willing to help, but with no prior knowledge of your work, your participants, or your context. The more you tell them, the more useful they become.
This is the practical heart of the toolkit. Each workflow below is built around a specific thing you want to achieve, not around a specific tool. Most of them can be done with whichever LLM you are already using. Where a specific tool is needed or strongly recommended, we say so.
You do not need to do all of them. Start with the one that is most relevant to your work right now.
Text is the most common barrier in youth work. Activity sheets, programme descriptions, application forms, briefing documents, social media posts, almost everything we produce relies on written language, and most of it is written at a level that excludes a significant chunk of the people it is meant for.
This workflow is the most universally useful one in the toolkit. It requires no special tools, no accounts, and no technical knowledge. All you need is an LLM and the text you want to adapt.
Give an LLM a piece of text and ask it to:
Each of these can be done in seconds. And they can be chained: ask for a plain language version first, then ask it to reformat that version for ADHD. Each step builds on the last.
Have your text ready. That is it. Any LLM works for this workflow.
One practical note: you do not always need to copy and paste. Most LLMs can accept an uploaded Word document or PDF and work with it directly. You can ask them to rewrite, reformat, or simplify the whole document and return it to you in a usable form. This is especially useful for longer materials like programme guides or information packs.
One caveat worth knowing: when you upload a document and ask an LLM to edit it, formatting often gets lost or simplified in the output, especially with larger files. Tables, columns, and visual layouts may not survive the process intact. For anything where the formatting really matters, it is sometimes cleaner to paste the key sections of text rather than uploading the whole file, and then reapply the formatting yourself at the end.
Each template below is ready to copy. Replace the text in brackets with your own content.
For: anyone. This is your default starting point before any more specific adaptation. Plain language helps non-native speakers, people with lower literacy, people who are tired or reading quickly, and honestly just about everyone.
Rewrite the following text in plain language. Use short sentences. Use common, everyday words and avoid jargon or technical terms. Use active voice. If you need to keep any specialist terms, add a brief explanation in brackets after each one. Keep all the key information but make it as easy to read as possible. [PASTE YOUR TEXT HERE]
What to check Make sure no important information has been dropped in the simplification process. Read it against the original.
For: people who struggle with long blocks of text, need clear structure to stay on track, or find it hard to hold a sequence of instructions in their head while doing a task.
Rewrite the following text for someone with ADHD. Break it into short numbered steps where possible. Use clear headings to separate different parts. Keep each paragraph to 2-3 sentences maximum. Highlight the most important action or takeaway in each section using bold text. Remove anything that is not essential. The goal is a version someone can follow without losing their place. [PASTE YOUR TEXT HERE]
What to check Does the structure actually make the content easier to follow, or has it just been broken into more pieces? The logic and sequence should be clearer, not just shorter.
For: people who find dense text difficult to decode, struggle with long sentences, or find certain visual layouts make reading harder.
Rewrite the following text in a dyslexia-friendly format. Use short sentences and short paragraphs with clear white space between them. Left-align all text. Use bold for emphasis instead of underlining or italics. Avoid justified text alignment. Break up any long lists into smaller chunks with clear headings. Use simple, common words wherever possible. Do not use abbreviations without explaining them first. [PASTE YOUR TEXT HERE]
What to check The visual formatting instructions in this prompt will shape the text structure, but if you are then copying the output into a designed document, make sure you apply the formatting choices (left-align, no justification, adequate line spacing) in the final version too. The words alone are not enough.
For: people who are reading in a language that is not their first, people with limited formal education, or anyone for whom complex written language creates a real barrier to participation.
Rewrite the following text for someone who is reading in their second or third language, or who has a lower level of literacy. Use very short sentences. Use only the most common, simple words. Avoid idioms, metaphors, and cultural references that may not translate. If a concept is complex, explain it in two or three simple sentences rather than using one complicated sentence. Aim for a reading age of around 10 to 12 years old. Keep the full meaning but remove all unnecessary complexity. [PASTE YOUR TEXT HERE]
What to check Read it aloud. If it sounds natural and clear when spoken, it will usually work well for this audience. Also check that no meaning has been lost in the simplification.
If you are working with a longer document, like a programme guide, an application form, or a project brief, you do not have to process it section by section. Upload the whole file directly to your LLM and give it a clear instruction. For example:
I am uploading a youth project information pack. Please rewrite the entire document in plain language, using short sentences and simple vocabulary throughout. Keep all the key information. Return it as a complete rewritten document.
This works well for getting a usable first draft quickly. Just be aware that formatting, tables, and visual layouts often do not survive the process cleanly, especially in longer documents. Treat the output as a working draft and check it carefully before using it, and be prepared to reapply any important formatting by hand.
Not everyone can access information through text. For young people who are deaf or hard of hearing, for participants with dyslexia or low literacy, or simply for someone who learns better by listening, audio can be the difference between being included in your programme and being left out of it.
This workflow covers two complementary skills: turning speech into text, and turning text into speech. Together they open up a new range of formats for your materials without requiring specialist equipment or technical expertise.
Speech to text tools convert spoken audio into written text. In a youth work context this is useful in more ways than people often realise: transcribing a recorded session so participants can read it back, creating written versions of verbal instructions, making your meetings and workshops searchable and shareable, or helping participants who find writing difficult to contribute verbally and still produce a written output.
One of the most widely used transcription tools. Records and transcribes in real time, identifies different speakers, and lets you edit the transcript after. The free tier gives you 300 transcription minutes per month, which is enough for regular use. Paid plans remove the limits and add features like custom vocabulary and CRM integrations. Particularly useful for workshops and team meetings where you want to capture everything without manually taking notes.
A free Android app that transcribes speech in real time directly on your phone screen. Designed specifically as an accessibility tool, primarily for deaf and hard of hearing users in face to face situations. It shows what is being said in large text as it happens, which can also work well as a live caption display during a session if you point the phone towards the speaker. Does not save transcripts automatically. No account needed.
Built into Microsoft Word and free with any Microsoft account. You speak, it types directly into your document. Accurate enough for practical use and genuinely useful for drafting long documents by voice. Supports multiple languages. No download needed if you already use Word or Microsoft 365.
Both iOS and Android have voice-to-text built into the keyboard, available in any app where you can type. Not as accurate as dedicated tools and does not identify speakers, but it requires nothing to set up and is always available. Good for quick notes, short messages, or getting ideas down fast.
An open source speech recognition model that can be run locally or accessed through various apps built on top of it. Exceptionally accurate, handles background noise well, and supports a wide range of languages including less common ones. Requires a bit more technical comfort to use directly, but many tools are built on top of it.
You do not always need a dedicated STT tool. If you have a recording on your device, whether it is a meeting, a workshop session, a participant interview, a voice note, or anything else, you can upload the audio file directly to ChatGPT or Gemini and ask it to transcribe it for you. Both handle audio files well and will return a written transcript, usually with reasonably good accuracy.
This is particularly useful when you want to do more than just transcribe. Once you have the transcript inside the LLM conversation, you can immediately ask it to:
One audio file, one upload, and you can produce several different useful outputs in the same conversation without copying anything between tools.
Text to speech tools take written text and convert it into spoken audio. For your participants this means you can offer an audio version of any written material: activity sheets, welcome messages, programme descriptions, briefing documents, reflection prompts. For people who struggle with reading, having the option to listen instead is not a small thing.
There are many TTS platforms available. ElevenLabs is currently the most sophisticated, with highly natural-sounding voices, multilingual support, and a lot of control over tone and delivery. Their free tier is limited in the number of characters you can generate per month, but it is worth trying for shorter outputs. Link: elevenlabs.io
For a more generous free option, Google has something that most people do not know about.
Google AI Studio gives you access to many of Google's top-tier AI functions for free, including a high-quality text to speech tool. Here is exactly how to use it.
Open whichever LLM you prefer (ChatGPT, Claude, or Gemini all work well here). Write or paste the content you want to turn into audio, then ask it to format it as a dialogue between two speakers. This makes the audio output feel much more natural and engaging than a single voice reading text. A prompt that works well:
Take the following text and rewrite it as a natural spoken dialogue between two people. Label them Speaker 1 and Speaker 2. Keep the content accurate but make it feel like a real conversation, not a recitation. The total length should be about [X] minutes when spoken aloud. Make it accessible and friendly in tone. [PASTE YOUR TEXT HERE]
Make sure the output clearly labels each line as Speaker 1: or Speaker 2:, as this matters for the next step.
Navigate to aistudio.google.com and sign in with your Google account. No separate account or payment needed.
In the left navigation, click on Playground. On the main screen you will see a toggle or dropdown to switch between different modes. Switch from Agents to Models.
From the model options, select Speech and Music. At the time of writing this guide, the available free model is gemini-3.1-flash-tts-preview. Google updates their available models regularly so the exact name may have changed, but the Speech and Music category will still be there.
You can either select one of Google's premade templates to get started quickly, or click the Turn Text Into Natural Speech button to start from scratch.
Google AI Studio has two separate input fields: one for the scene or context, and one for the dialogue itself. Use them separately. In the scene/context field, describe the situation and tone:
This is a friendly, accessible audio guide for youth workers. Speaker 1 is a facilitator, Speaker 2 is a participant asking questions. Keep the tone warm, clear, and unhurried.
In the dialogue field, paste your Speaker 1 / Speaker 2 transcript:
Speaker 1: Welcome to today's session...Speaker 2: Thanks, I have a question about...
Before generating, you can edit the dialogue directly in the interface, add emotion cues to specific lines (such as enthusiastic or calm and reassuring), and change the voices assigned to each speaker from the available options. When you are happy, generate the audio and download it.
These tools are most powerful when they become a normal part of how you prepare and deliver your programmes, not a one-off experiment. Here are some concrete ways to use them:
Take your activity sheet, welcome message, or daily schedule and run it through the TTS workflow. Offer it as a downloadable audio file or a short voice note alongside the written version. This immediately makes your materials more accessible for participants with dyslexia, low literacy, or visual impairments.
Record your workshops (with participant consent), upload to an LLM, and get a transcript. Use that transcript to create a written summary, pull out key learnings, or produce a plain language recap to share with participants after the session.
Long application forms, Erasmus+ guidelines, project briefs, any dense written document can be turned into a short audio summary. Upload it to an LLM, ask for a plain language summary, then run that through TTS. Participants who struggle with long documents can listen to the key points instead.
Combine STT and Workflow 1 to produce transcripts in one language, then use an LLM to translate and simplify, then run through TTS in the participant's language. It is not a perfect solution, but it is a significant step up from a text-only document in a language someone is still learning.
Instead of asking everyone to write their reflections, offer the option to record a voice note. Upload those to an LLM to transcribe, then work with the written outputs in the same way you would with anything written. Nobody has to know it started as audio.
Good visuals make content more accessible. A well-designed poster communicates faster than a paragraph of text. An infographic breaks down a complex process so anyone can follow it. An illustrated explainer works across language barriers in a way that dense written content never will. AI image generation has made it possible to produce this kind of material quickly, without a designer, and without a budget.
Prompting for images is not the same as prompting for text. When you ask an LLM to rewrite a paragraph, you are working with language about language. When you ask it to generate an image, you need to build an entire scene in words: who is in it, what they are doing, where they are, what the light looks like, what angle you are seeing it from, what style it is rendered in, and what text should appear.
The more layers you describe, the closer the result will be to what you imagined. Vague prompts produce generic results. Specific prompts produce useful ones.
A few principles from Google's official prompting guide apply here: be specific and provide concrete details on subject, lighting, and composition. Use positive framing and describe what you want rather than what you do not want. Control the composition using photographic and cinematic language like "low angle shot", "aerial view", or "soft natural light". And iterate, refining images with follow-up prompts rather than starting over each time.
The prompts below are built using Google's official image prompting templates, adapted for youth work contexts. Each one follows the same principle: describe the scene in full, do not just list keywords.
Use this when you need something that looks like a real photograph, for social media, programme materials, or communication that needs to feel grounded and human.
Template structure A photorealistic [shot type] of [subject], [action or expression], set in [environment]. The scene is illuminated by [lighting description], creating a [mood] atmosphere. Captured with a [camera/lens details], emphasising [key textures and details].
A photorealistic wide-angle shot of a diverse group of eight young people, aged 18 to 25, gathered around a large table in a bright, modern community centre. They are engaged in an animated group discussion, some leaning forward, some writing notes, one pointing at a laptop screen. The group includes people of different ethnicities, some wearing casual clothes, one in a headscarf. The scene is illuminated by soft natural light coming through tall windows on the left side, creating a warm and energetic atmosphere. Captured with a 35mm wide-angle lens, sharp focus on the group, slightly blurred background. Photorealistic, natural colours.
Use this when you need a complete communication piece with readable text, event posters, activity announcements, accessible information materials.
Template structure Create a [image type] for [brand/concept] with the text "[text to render]" in a [font style]. The design should be [style description], with a [colour scheme].
Create a bold, accessible event poster for a youth workshop called "AI and Inclusion". The main title "AI and Inclusion" should appear at the top in large bold sans-serif font. Below it in medium font: "A practical workshop for youth workers". Then in smaller text: "Saturday 14 June · 10:00-17:00 · Youth Centre, Room 3". At the bottom: "Free entry. All welcome." The design should be clean and modern with a white background, strong teal and orange accent colours, and a simple flat illustration of two people collaborating around a laptop in the centre. High contrast, readable at a distance, no decorative clutter.
Use this when for educational explainers, storytelling content, materials for younger audiences, or anything where a friendly illustrated style is more accessible than a photograph.
Template structure A single comic book panel in a [art style] style. In the foreground, [character description and action]. In the background, [setting details]. The panel has [caption] with the text "[text]".
A single comic-style panel in a clean, friendly flat illustration style with bold outlines and bright colours. In the foreground, a young person sits at a desk looking confused at a dense, cluttered document on their laptop screen. In the background, a simple clean version of the same document floats in a speech bubble next to an AI assistant icon. A caption box at the top reads: "Before and after: AI makes your materials easier to read." Warm, welcoming colour palette. Landscape orientation.
GPT Image 2 is the model to choose when your image depends on readable text, ordered panels, diagrams, UI-like layouts, or exact placement. This makes it the strongest option for youth work materials like posters, infographics, invitation cards, and step-by-step visual guides. You can paste your full text content directly into the prompt, describe how you want it laid out, and it will produce something genuinely usable. The text rendering is exceptionally accurate compared to most other models.
Once an image is generated, ChatGPT lets you edit it directly by clicking on the image and describing the change you want. You can move elements, change colours, update text, adjust the layout, or ask it to regenerate just one part of the image. This makes iteration fast and means you do not need to start over every time something is slightly off.
Nano Banana 2 is the stronger choice when the image depends on photorealism, skin, materials, cinematic light, or a product hero that should feel camera-shot. For portraits, realistic scenes, and atmospheric photography-style images it is genuinely competitive. Where it falls behind ChatGPT is text inside images, which can sometimes come out slightly broken or misaligned, so it is not the best tool for posters or infographics with important readable content. Nano Banana 2 requires a paid Google AI subscription to access.
The original Nano Banana is particularly strong for image editing tasks: subject consistency, combining multiple photos into one seamless output, and making context-aware edits to existing images. If you have a photo you want to adapt, remove a background from, combine with other elements, or modify in a specific way, this model handles that kind of task well. The original model is available for basic image editing tasks on the free tier.
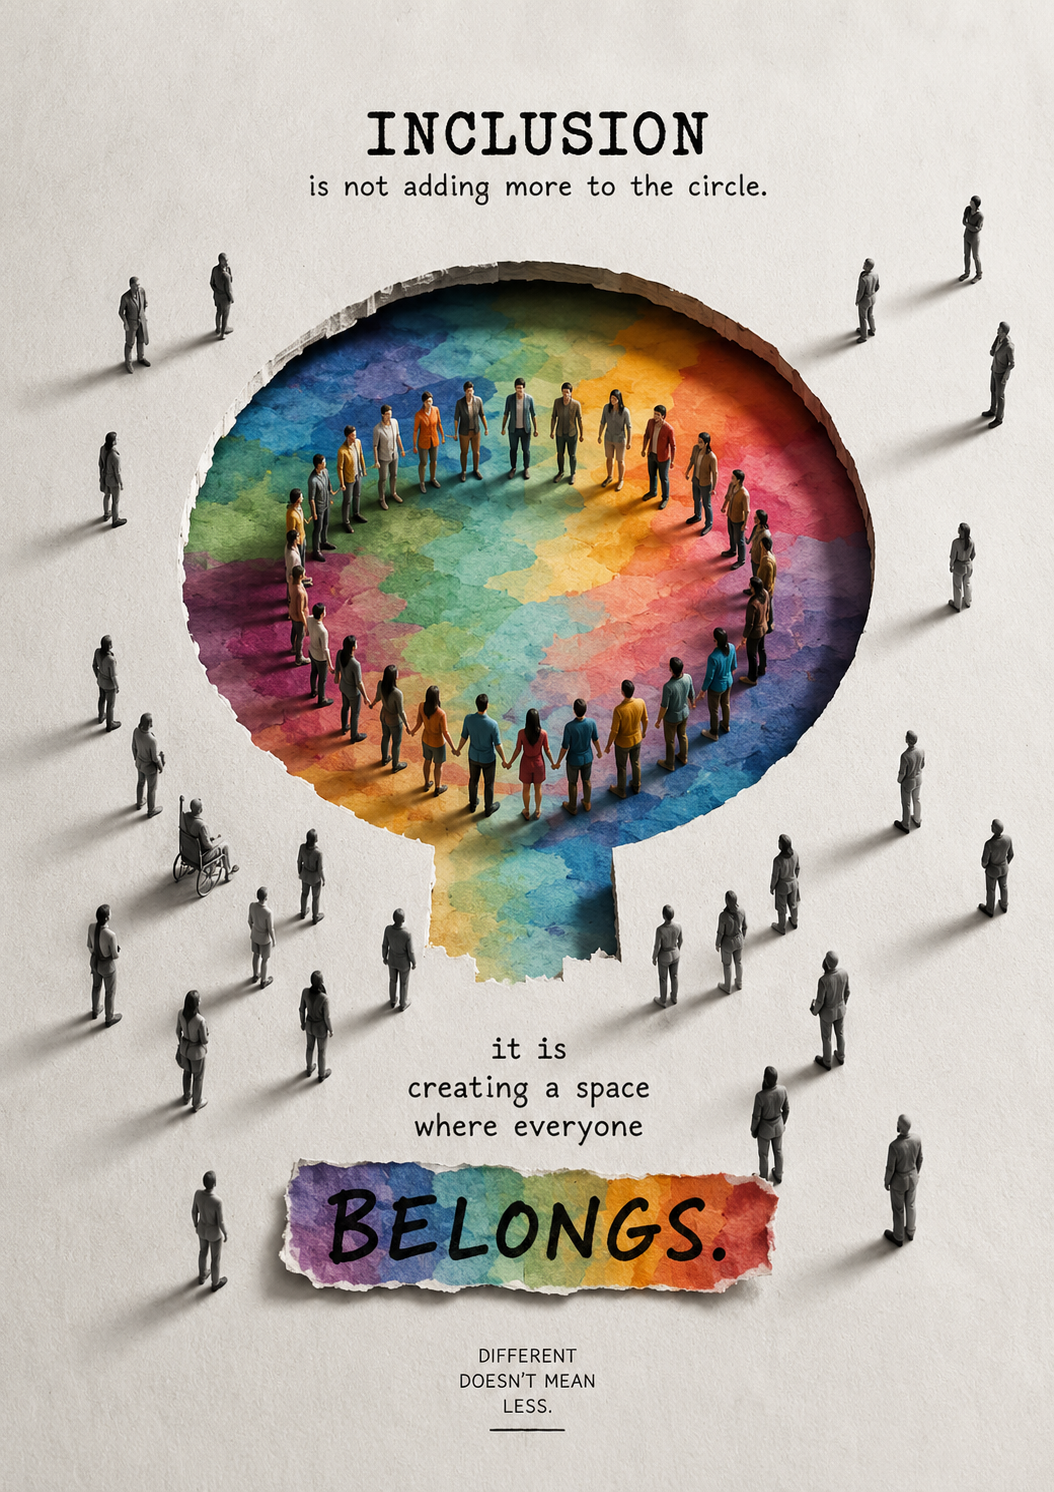
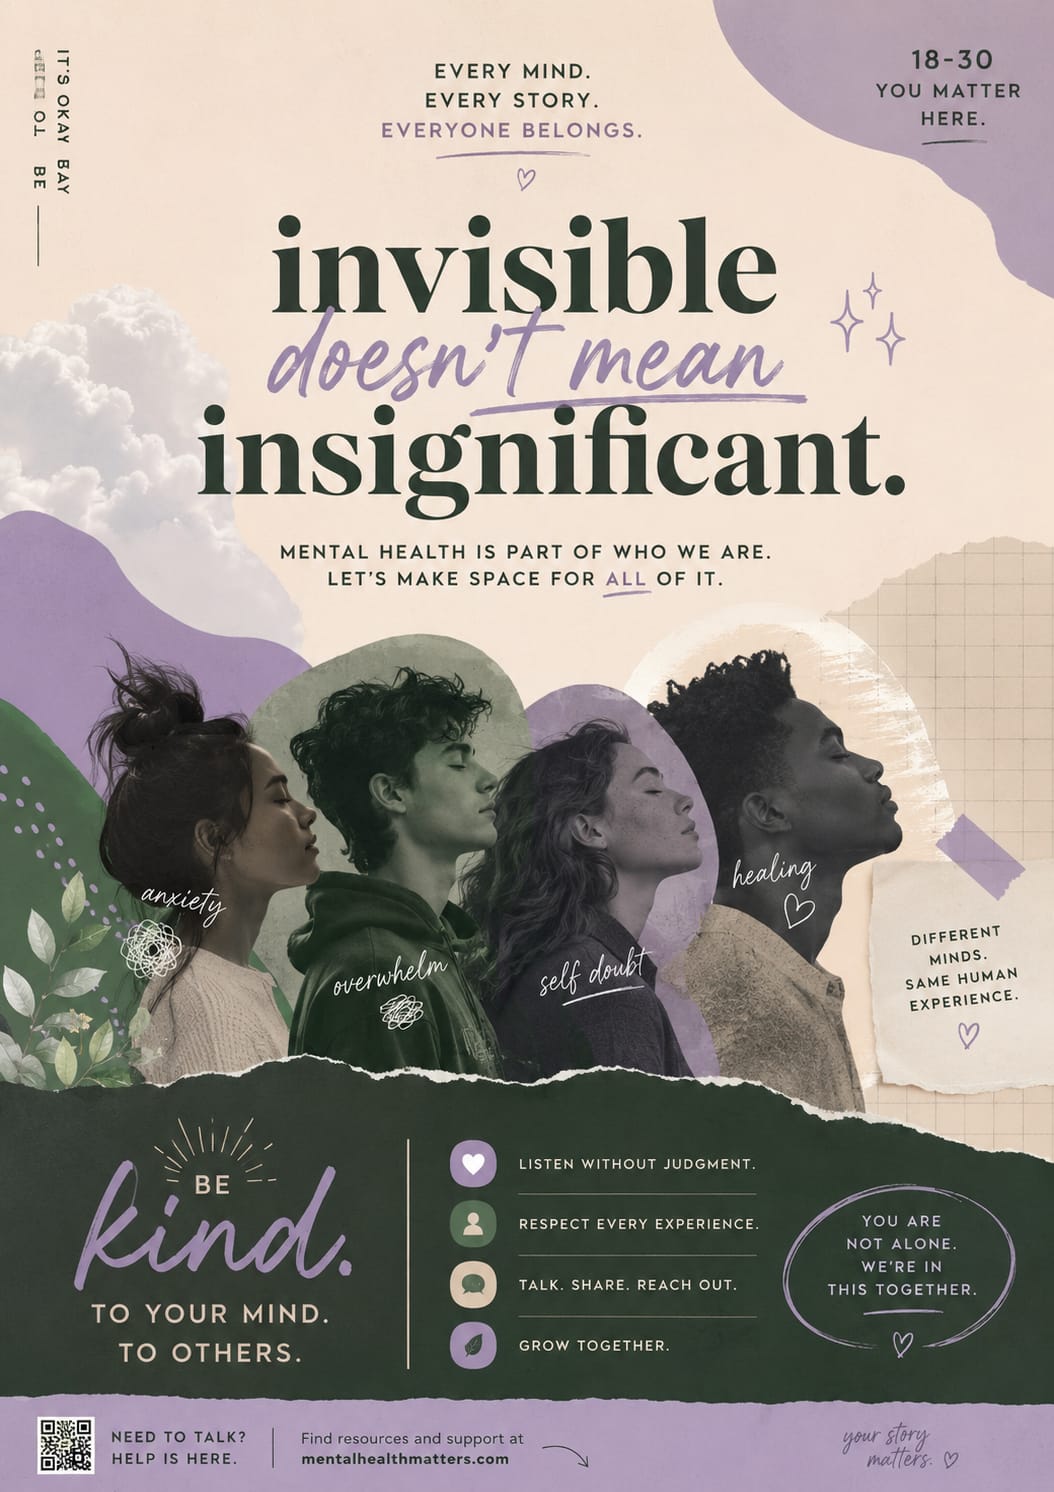
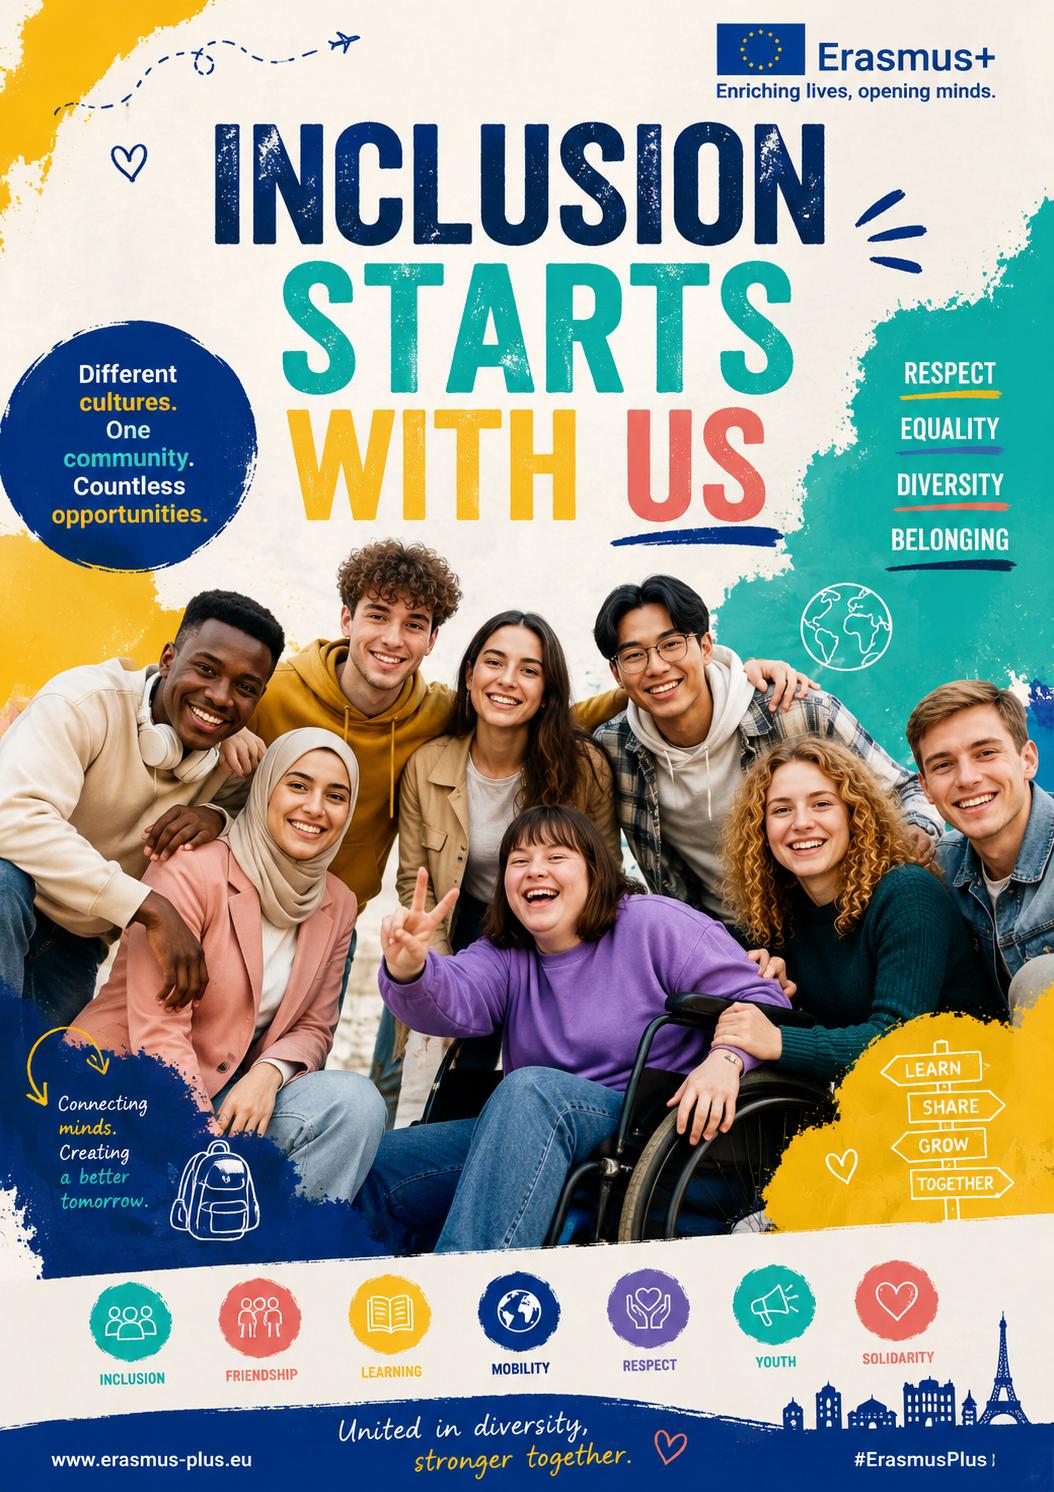
Poster examples created by participants during InFormal Intelligence, Riga 2026. Click any image to enlarge.
Ever seen a visual you loved and wished you could create something similar? You do not need to figure out the prompt from scratch. Upload the image to ChatGPT and use this prompt:
Analyse this image, and then write me a prompt that you think would get ChatGPT to actually create this image. Reverse engineer the prompt.
ChatGPT will return a detailed text description of the image broken down into all the elements that matter: subject, composition, lighting, style, colours, mood, and any text present. You then take that description, swap in the things you actually need, and use it as your starting prompt.
This works in two ways. In the short term, it gets you much closer to the result you want without trial and error. But it is also one of the fastest ways to learn how to write image prompts, because you see exactly how an AI translates a visual into language. After doing this a few times with different types of images, patterns start to click and your own prompts get noticeably better.
Canva is a browser-based graphic design platform that lets anyone create professional-quality visual materials without any design experience. You work from templates, drag and drop elements, and export finished designs in whatever format you need. It is one of the most widely used tools in the nonprofit and youth work sector for a reason: it removes the barrier of needing a designer for every poster, report, or social media post your organisation produces.
The range of content types you can create in Canva is genuinely wide. Presentations and slide decks, social media posts and stories, event posters and flyers, programme reports and infographics, certificates, newsletters, video content, email banners, logos, activity cards, workshop materials, and much more. There are hundreds of thousands of templates across all of these categories, many of them already designed with clear, accessible layouts.
canva.com · Free plan available, Pro plan required for full features
Canva for Nonprofits gives eligible organisations free access to the full Canva Pro plan, including AI-powered design tools, brand management, and team collaboration for up to 50 users. That is a significant offer. It gives you full access to all the editing features, design tools, and stock assets of Canva's premium plans, including the resize tool, background removal tool, social scheduling, and brand management features.
Your NGO must be officially or legally registered as a nonprofit or charity organisation to qualify. If your organisation meets that criteria, applying is straightforward through canva.com/canva-for-nonprofits. The value of what you get in return is hard to overstate for a team working with limited design resources.
Canva's AI tools sit under the Magic Studio banner and are available within the editor. These are the ones most directly useful for youth work and inclusion-focused content creation:
An AI writing assistant built into Canva. Use it to draft, rewrite, simplify, or expand text directly inside your design. Useful for producing plain language versions of content without leaving the design environment.
Describe what you need and Canva generates a fully designed template to match. Useful when you need a starting point quickly and do not want to browse hundreds of templates manually.
Transforms an existing design into a different format or resizes it for a different platform in one click. Turn a presentation into a document, or resize a poster for Instagram, Facebook, and LinkedIn at once.
Removes unwanted objects from photos cleanly, including shadows and reflections. The quality has been improved so removals are cleaner and more natural-looking, with no shadows or reflections left behind.
Lets you select and move individual elements within a photo, such as lifting a person out of a background to reposition them within a design.
Extends an image outwards beyond its original borders, with AI generating the surrounding content to match. Useful for adapting a portrait image to a landscape layout.
Translates the text in any Canva design into another language automatically, preserving the layout and formatting. Particularly useful for producing multilingual versions of posters, flyers, or activity sheets without rebuilding the design from scratch.
Removes backgrounds from photos with one click. A premium feature, included in the Canva for Nonprofits plan.
In April 2026 Canva announced its most significant update to date: Canva AI 2.0. The shift moves the platform from a design tool with AI features to something much closer to a full creative collaborator. You describe what you need in plain language, Canva plans and executes the work across multiple formats at once, remembers your brand and style preferences, and can connect with tools like Google Drive, Gmail, and Notion to pull in context automatically.
Canva AI 2.0 launched as a research preview in April 2026 and is rolling out to users progressively. By the time you read this, it may already be available in your account. For youth workers producing regular visual content, the time savings are going to be significant.
These workflows go a step further than the previous ones. They combine multiple tools in sequence and produce more complex outputs. None of them require technical skills to get started, but they do reward experimentation and iteration.
This three-step workflow lets you go from a rough visual idea to a working, clickable web interface without writing a single line of code yourself. It is particularly useful for youth workers who want to build a simple landing page, a registration form, an information hub, or a basic interactive tool for their participants.
This step is optional. Google Stitch is capable of generating a solid interface design from a text description alone, so you can jump straight to Step 2 if you prefer. But having a visual reference ready makes the result much more accurate to what you have in mind, and it is worth the extra few minutes if you have a specific look or layout in your head. Open ChatGPT and use the image generation tool to create a visual mock-up of the interface you want to build. Describe it as a design or screen layout rather than as a photograph.
Design a clean, modern mobile app screen for a youth project registration form. It should have a header with the project logo placeholder, an input field for name, an input field for email, a dropdown for country, and a large "Register Now" button in teal. Minimal design, white background, clear readable fonts. Show as a phone screen mock-up.
Google Stitch is a free browser-based tool from Google Labs that turns text prompts or images into working UI designs and interactive prototypes. Think of it as a Figma-style design environment powered by AI, where you describe what you want and it builds the layout for you. Navigate to stitch.withgoogle.com and sign in with your Google account. Upload the image you generated in Step 1, or simply describe the interface you want in text. Stitch will generate a designed screen with the right components, layout, and spacing. You can then click on any element to edit it directly, swap images, adjust text, and connect multiple screens together to build a clickable flow. Once you are happy with the design, click Export and select Open in AI Studio. This sends your design directly to the next step.
stitch.withgoogle.com · Free
When you export from Stitch to Google AI Studio, you arrive with a starting prompt already generated based on your design. Google AI Studio will attempt to produce a working HTML and CSS interface from that prompt, which you can preview immediately in the browser. From here you can iterate conversationally. Ask it to change colours, adjust the layout, add a new section, or modify the text. The result is a functional web interface that you can download as a file or share as a link.
aistudio.google.com · Free
This workflow is excellent for simple, standalone interfaces: a landing page, an information screen, a registration form, a basic tool with a few inputs and outputs. It produces real, working HTML and CSS that behaves in a browser.
For more complex functionality, things like user logins, databases, stored data, or connections to external systems, Google AI Studio can technically generate and connect backend logic too. But this is where things get significantly more difficult. It is very possible to do, but the complexity rises fast, the risk of things breaking quietly or behaving insecurely goes up just as fast, and for someone without a software development background it becomes a long and frustrating journey. The tool will generate something that looks like it works, but making it actually work reliably and safely in a real environment requires understanding what is happening under the hood. If you want to build something at that level of complexity, involve a developer, or invest real time in learning the basics of how web applications are built before directing AI to build one for you.
Interfaces generated this way and published publicly carry real security risks if they handle any user data or connect to other systems. Before publishing anything built with this workflow that collects participant information, sends data anywhere, or sits on a public URL, get someone with web development experience to review it. A simple static information page carries minimal risk. Anything more complex deserves proper scrutiny before going live.
Most people who use Google products every day have no idea that two of the most powerful and accessible AI platforms Google offers are sitting there for free, waiting to be used. Google AI Studio and Google Labs are where a lot of the tools mentioned throughout this toolkit actually live, and knowing they exist opens up a significant amount of additional capability for anyone willing to spend a few minutes exploring.
Google AI Studio is a free, browser-based workspace where you can work directly with Google's most advanced Gemini models, no setup, no installation, no technical background required. You sign in with any Google account and you are in.
It is the backstage of a lot of what this toolkit covers. The TTS workflow in Workflow 2, the image generation with Nano Banana, the prototype export from Google Stitch, all of these connect back to AI Studio. But it is also a powerful standalone environment for testing prompts, uploading documents, processing audio and video files, and building simple AI-powered tools.
The interface is always free. Where costs can apply is if you connect a Google Cloud billing account and start using the API at high volume, but for the kind of exploratory and practical use this toolkit is about, you are unlikely to hit those limits.
One thing worth knowing: on the free tier, Google may use your inputs to improve its models. If you are working with sensitive participant data or confidential organisational materials, use the paid tier or keep that content out of the platform entirely.
aistudio.google.com · Free with Google account
Google Labs is Google's public hub for experimental AI tools, the place where new ideas get tested with real users before they become mainstream products. Almost every major Google AI feature you use today started here. NotebookLM was a Labs experiment. Google Stitch was a Labs experiment. The Audio Overview in NotebookLM, Gemini Live, AI Overviews in Search, all of them spent time in Labs before most people knew they existed.
The entry point is labs.google. What you find there changes regularly as tools graduate to full products, get retired, or get replaced by something newer. It is worth visiting occasionally just to see what is available. Below are the tools currently in Labs or recently graduated from it that are most relevant for youth work and inclusive content creation.
Turns text descriptions or images into interactive UI prototypes and exports code. Covered in detail in this workflow. Completely free.
An AI filmmaking and video creation tool built on Google's Veo video generation models. Lets you create cinematic video clips, build scenes, and tell stories through AI-generated video. Useful for engaging visual content for campaigns, project documentation, or outreach materials. More polished output than most video AI tools.
A dedicated image generation interface using Google's Nano Banana models, accessible without going through Gemini or AI Studio. Clean, simple interface for generating images from text prompts. A good starting point for anyone new to image generation.
Generates original background music from a text description of style, mood, and structure. Useful for adding audio to video content, presentations, or session materials without licensing concerns. Describe what you want, the mood, the tempo, the feel, and it produces a short audio track.
Generates fully illustrated storybooks from a simple text prompt, a photo, or a drawing. Particularly useful for working with children, explaining complex or sensitive topics in an accessible way, or creating inclusive educational materials. Available inside the Gemini app.
A no-code tool for building simple AI-powered mini apps. Describe the tool you want to create, and Opal builds a working interface for it. Useful for small interactive tools for participants, such as a guided reflection tool, a simple quiz, or a resource finder, without needing any coding skills.
As a general rule: anything you find on labs.google should be treated as experimental. Tools can change significantly, disappear, or graduate into a paid product at any time. That is the nature of Labs. But the quality of what is available there is genuinely high, and for a youth worker looking to try new things without spending money, it is one of the best free destinations on the internet right now.
Sometimes the most memorable way to raise awareness or teach something is through a song. Suno is an AI music generation tool that creates original songs complete with vocals, instrumentation, and lyrics from a simple text prompt. You describe the style, mood, topic, and what you want the song to say, and it produces something you can actually listen to, share, and use.
For youth workers this opens up a genuinely fun and effective avenue. A short catchy song about digital rights, online safety, inclusion, or any topic you are working on lands differently than a handout or a slide. It works well as an icebreaker, as a discussion starter, as a memorable closing to a session, or as shareable content for social media campaigns that cuts through in a way that text rarely does.
Write and produce a short upbeat pop song about the importance of making youth activities accessible to everyone. The tone should be warm, hopeful, and energetic. Include a clear chorus that sticks. Aimed at young people aged 16 to 25.
Suno gives you two generated versions to choose from, and you can regenerate or refine with follow-up instructions. The free tier allows a limited number of songs per day, which is enough for experimentation. A paid plan removes the daily limit and adds commercial use rights. suno.com · Freemium
Most AI tools draw on everything they were ever trained on. Ask ChatGPT a question and it pulls from a vast, general knowledge base that you have no visibility into and no control over. That is useful for many things, but it creates a specific problem: you can never be fully sure where the answer came from, and the AI can confidently give you something wrong.
NotebookLM works differently. It only ever uses the sources you upload. Nothing more. You give it your documents, your research, your materials, and it works entirely within that boundary. Every answer it gives you includes a direct citation you can click to verify exactly where in your sources that information came from. This is what Google calls source-grounded AI, and it is the reason NotebookLM has become one of the most genuinely trusted AI tools for learning and teaching.
For youth workers this matters in two practical ways. When you are learning something, you can upload the materials you are working with and have a conversation with them, ask questions, request summaries, get explanations at different levels of complexity, without the AI wandering off into things you did not ask about. And when you are teaching or facilitating, you can build a notebook around your programme materials and use it to create multiple formats of the same content for different learning needs, all grounded in what you actually wrote.
NotebookLM only ever uses the sources you upload, and your uploads are not used to train Google's AI models. What you put in stays yours.
notebooklm.google.com · Free with Google account
NotebookLM organises everything into notebooks. Each notebook is a self-contained workspace with its own set of sources and its own chat history. You can have up to 100 notebooks on the free plan.
Go to notebooklm.google.com and click Create New Notebook. Give it a name that reflects what you are working on.
Click Add Sources. NotebookLM accepts a wide range of formats:
Each source can be up to 500,000 words or 200MB in size. On the free plan you can add up to 50 sources per notebook, which is more than enough for most projects. A few tips for getting better results: the more relevant and specific your sources, the better the outputs. If you are building a notebook to support a training programme, upload the actual materials, session plans, activity descriptions, and background reading rather than everything you can find on the topic. Focused sources produce focused outputs.
Once your sources are uploaded, the chat panel opens on the right. Ask questions in plain language. NotebookLM will answer based only on what you uploaded, and every response will include clickable citations so you can see exactly where each piece of information came from. Some useful starting prompts:
Summarise the key ideas across all my sources in plain language.
What are the main barriers to inclusion mentioned in these materials?
Explain [concept] as if you are talking to someone with no background in this topic.
What are the most important things a youth worker would need to know from these documents?
Once you have your sources uploaded, the Studio panel (accessible from the top of the notebook) lets you transform your content into a range of different output formats. This is where NotebookLM becomes genuinely powerful for inclusion work, because the same source material can become audio, visual, interactive, or structured depending on what your participants need.
A podcast-style conversation between two AI hosts summarising your sources. It sounds natural, covers the main ideas, and you can join the audio live and ask the hosts questions in real time. Useful for offering participants an alternative to reading.
A narrated visual presentation built from your documents, customisable by style and language. Particularly useful for creating accessible explainer content from written materials. Currently in wider rollout.
A structured written summary of the main ideas across all your sources, organised with headings and sections. Useful for a clean, readable overview of a complex set of documents without writing it yourself.
A ready-to-use presentation built directly from your materials. As of February 2026 you can edit individual slides without regenerating the whole deck, and export to PPTX or continue editing in Google Slides.
A visual diagram showing the key concepts from your sources and how they connect to each other. Useful for giving participants a visual overview of a topic, or for your own planning and structure work.
Automatically generated study cards from your content to help memorise key terms, concepts, or ideas. Useful for participant preparation before a session or for self-directed learning after one.
A set of questions generated from your content to test understanding. Useful for evaluation, self-assessment, or as a reflection tool at the end of a training session.
A visual snapshot of the most important information from your sources. Useful for creating shareable summary materials or accessible one-page overviews of complex content.
A structured table that organises information from your sources and can be exported to Google Sheets. Useful when your sources contain lists, comparisons, or structured information.
All core Studio features are available on the free tier. For most youth workers using NotebookLM as a regular part of their practice, these limits are genuinely comfortable. You would need to be running multiple large research projects in parallel, generating Audio Overviews on demand every day, and feeding dozens of sources into notebooks constantly before you would start hitting them. Start with the free plan and see how far it takes you.
A curated directory of AI tools organised by use case. Each entry notes who makes it and a short description of why it matters. The landscape moves fast, so treat this as a living list rather than a fixed reference.
Most-used AI assistant globally. Text, images, voice and file analysis.
MultimodalLong-context reasoning and writing, built for accuracy and safety.
MultimodalGoogle's frontier model with deep Search and Workspace integration.
MultimodalOpen-source Chinese model matching frontier AI performance at a fraction of the cost.
Alibaba's multilingual open model, strong at reasoning across 29+ languages.
Meta's open model, free to download, modify, and run on your own hardware.
Fast, efficient European open model built for privacy and on-device use.
Real-time access to X/Twitter content; handles images and long documents.
MultimodalChatGPT's native image generation. Photorealistic, precise, and instruction-following.
Gold standard for artistic AI imagery, the tool most used by designers.
Google's photorealistic image model, integrated into Gemini and Workspace.
Commercially safe generation trained only on licensed Adobe Stock content.
Open-source model you can run locally on your own hardware, completely free.
Best-in-class text rendering inside images: posters, logos, typography.
Inline AI code completion inside any IDE, used by 1.8M+ developers daily.
AI-native code editor that understands your entire codebase at once.
Terminal agent that plans and executes multi-file coding tasks end-to-end.
Autonomous coding agent. Given a task, it independently builds and tests.
Browser IDE for building and testing with Gemini models; free API access.
Cloud coding environment with AI that deploys a live app in one click.
Leading voice cloning and TTS. 99 languages, indistinguishable from human.
Full song generation from a text prompt: lyrics, vocals, and production.
Music generation with fine-grained control over style and instrumentation.
Open-source speech-to-text in 99 languages, the engine behind many transcription tools.
Google's text-to-speech and speech recognition APIs, accessible via AI Studio.
Google's flagship video generation model with native audio synthesis.
Professional AI video creation and editing, used by major film studios.
High-quality video generation rivalling Western tools at competitive cost.
Realistic 3D-aware video generation from text or a single image.
AI avatar video for personalised explainers and corporate communications.
Every answer is cited from live web sources, replacing traditional search for many.
Upload your documents; AI answers questions sourced only from your own files.
AI-powered search with app integrations, code execution, and customisable modes.
Open-source workflow automation. Connect any app or AI model without code.
AI software engineer that independently plans, writes, and tests full projects.
Playful interactive AI agent, one of the more creative experimental tools.
Shared AI workspaces where teams give Claude persistent memory and instructions.
If you have worked through this toolkit, you have picked up a set of skills that most people in youth work do not yet have. Not because they are hard, but because nobody showed them how. This page is a reminder of exactly what you are now capable of, and what becomes possible when you start combining it.
Generate written content from scratch, rewrite existing materials in plain language, simplify complex documents for different reading levels, adapt content for ADHD-friendly or dyslexia-friendly formats, translate materials into other languages, summarise long documents into short readable overviews, and produce multiple versions of the same content for different audiences in minutes.
Turn any spoken recording into a written transcript, summarise and adapt that transcript, turn any written text into natural-sounding speech, create two-voice podcast-style audio from a document, caption live sessions in real time, and offer audio alternatives to written materials for participants who need them.
Generate photorealistic images of people, places, and situations, create illustrated and comic-style visuals for educational content, design complete posters and infographics with readable text, edit and adjust generated images by describing the changes you want, and reverse-engineer the style of any image you admire to recreate something similar.
Build accessible, professional visual materials in Canva without a designer, produce multilingual versions of any design automatically, apply brand consistency across all your outputs, and create content across multiple formats from a single starting point.
Turn a visual concept into a clickable web interface without writing code, export it as working HTML, and build simple digital tools for your participants or organisation.
Upload any set of documents to NotebookLM and generate audio overviews, video summaries, slide decks, mind maps, flashcards, quizzes, infographics, and data tables from the same source material, grounded in what you actually wrote with no hallucinations.
Structure your requests using proven frameworks to get consistently better results, iterate on outputs rather than starting over, give AI the context it needs to produce something actually useful, and reverse-engineer prompts from results you like.
This is where it gets interesting. Each skill above is useful on its own. But put two or three of them together and the outputs become something you could not have produced before without a team, a budget, and weeks of work.
Take your existing programme documentation, run it through plain language simplification, reformat it for ADHD-friendly reading, generate a Canva layout with clear visual hierarchy, add an auto-translated version in the languages your participants speak, and export a designed PDF. One document, multiple formats, accessible to everyone.
Choose a topic relevant to your work, upload background reading to NotebookLM, generate an Audio Overview, or write a two-speaker script with an LLM and produce it as a natural-sounding audio file using Google AI Studio. Add a designed cover image generated in ChatGPT. Ready to share or publish.
Write a caption in plain, engaging language, generate a matching visual in the right format and dimensions, produce a short audio version of the caption as an accessible alternative, and have a translated version ready for a multilingual audience. Everything a complete, accessible social post needs.
Design a screen layout in ChatGPT Images, bring it into Google Stitch to build an interactive prototype, refine it in Google AI Studio, and export a working web page. No developer, no design agency, no cost.
Upload your session plan and supporting materials to NotebookLM. Generate a slide deck for visual learners, an audio overview for those who prefer to listen, flashcards for self-directed preparation, and a quiz for reflection at the end. One set of materials, four formats, ready for a genuinely diverse group.
Write a warm, plain language welcome message, simplify it further for non-native speakers, generate an audio version using TTS, design a visual one-pager in Canva with icons and clear layout, and produce a translated version. Everything a new participant might need to feel informed and included before they even walk through the door.
AI in service of making youth work more human.
None of these outputs required a designer, a developer, a recording studio, or a production budget. They required curiosity, a few free tools, and the knowledge of how to connect them.
That is what this toolkit was always about. Not AI for its own sake, but AI in service of making youth work more human, more accessible, and more useful for the young people who need it most.
The tools will keep changing. New ones will appear, current ones will improve, some will disappear. What will not change is the underlying skill: knowing how to think about what you need, break it into steps, and find the right tool for each one. That is what you have now.
InFormal Intelligence Toolkit, produced by Peace of Mind and project partners, Riga 2026.
Erasmus+ KA153-YOU · Open resource, free to use, share, and build on.
Funded by & in partnership with
Co-funded by the European Union. Views and opinions expressed are however those of the author(s) only and do not necessarily reflect those of the European Union or the European Education and Culture Executive Agency (EACEA). Neither the European Union nor EACEA can be held responsible for them.
Project 2025-3-LV02-KA153-YOU-000375250 · Erasmus+ KA153-YOU · Managed by the Latvian National Agency, Jaunatnes starptautisko programmu aģentūra (JSPA).